Posted on

Refill your Copic Markers!

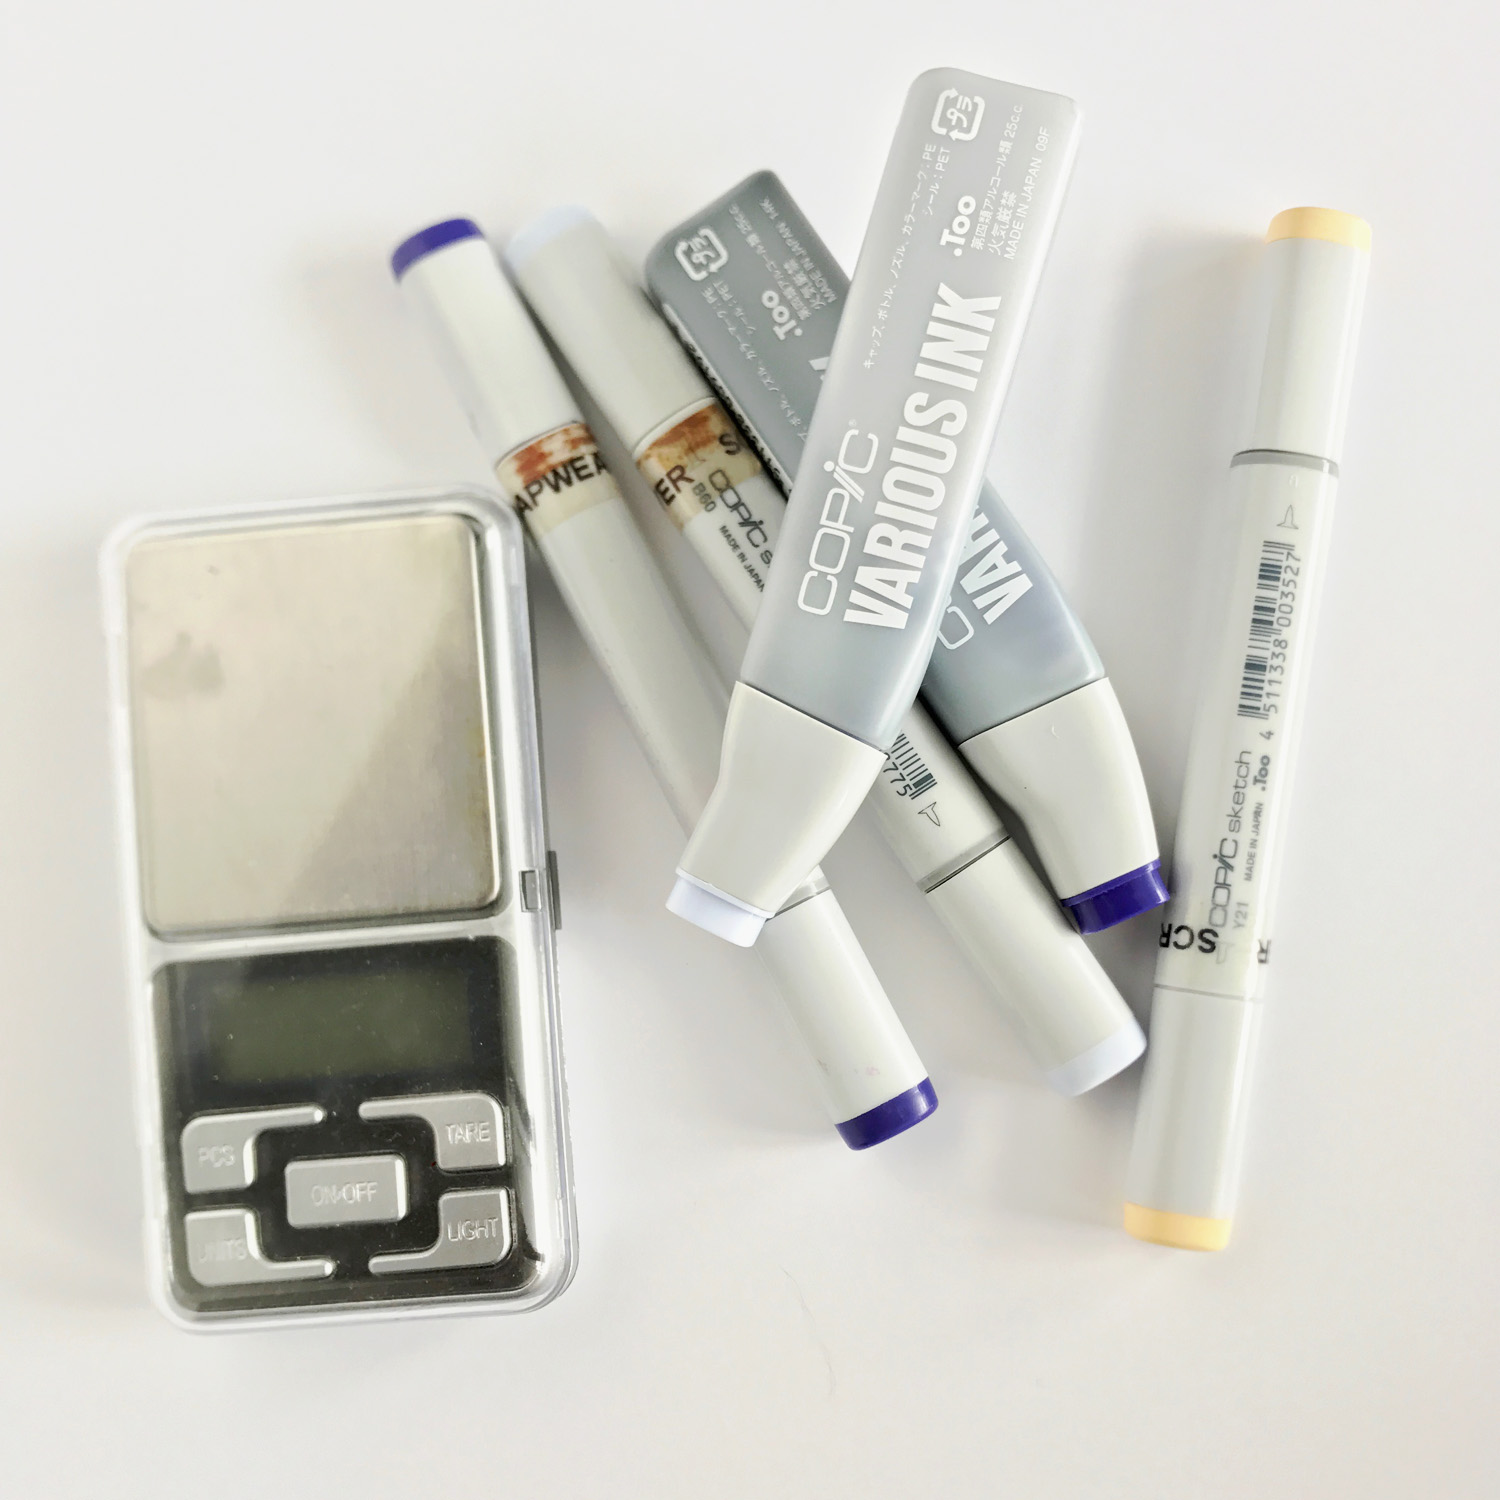
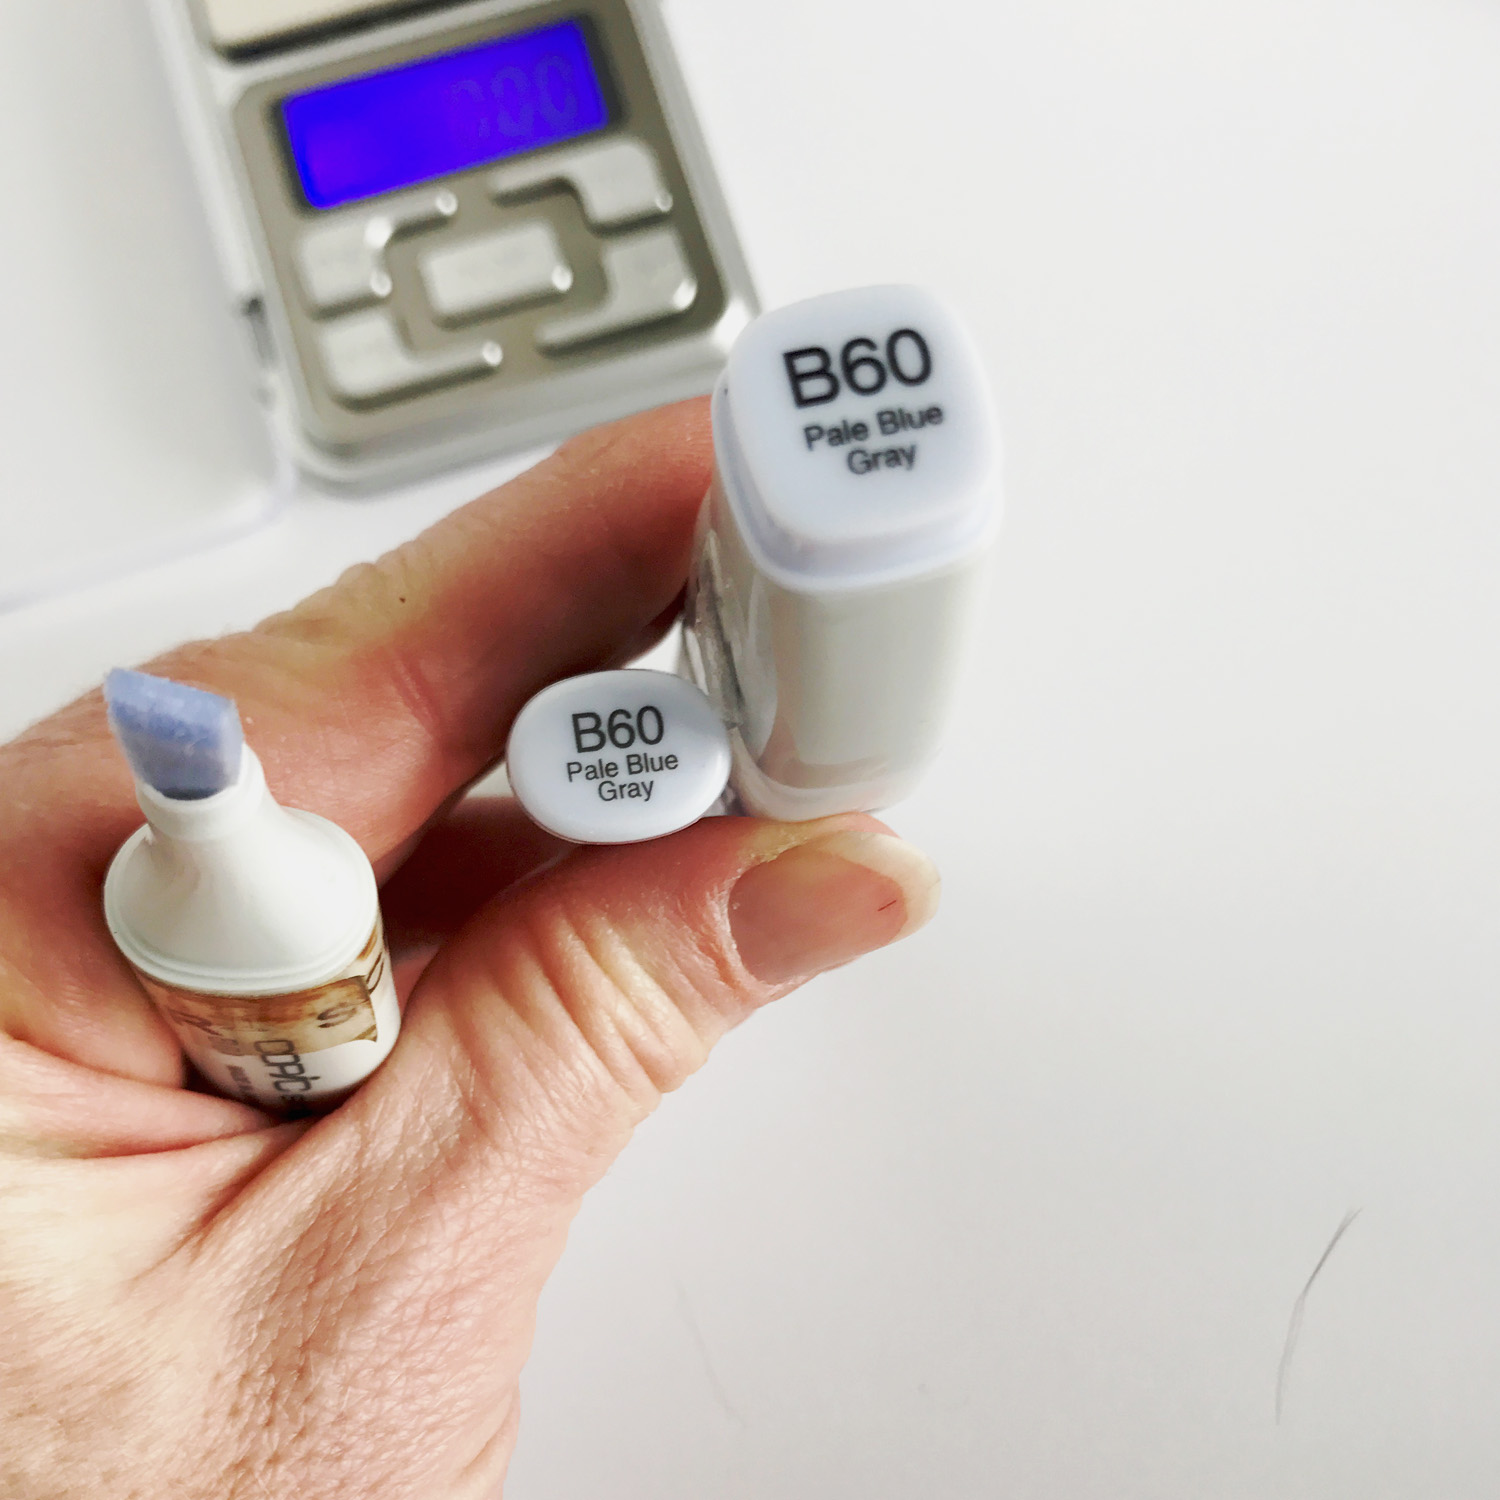
How many of you would like to know how to refill your Copic markers? It is one of the questions instructors get frequently and although we go over the information in the Standard Certification class it is valuable information to revisit! There are a few ways to refill your markers including using the booster (needle that screws onto the refill bottle) and pulling out the chisel nib to poor ink into the core. Below I will share my favorite way to refill my markers. I need my markers that are low in ink, Various Ink (the refills bottles) and I am using a pocket scale. 

refill-1

The first thing that I am going to do before trying to refill any markers is measure a full marker so I know what I am aiming for with my scale. I place a new sketch marker on my scale with both lids on and find out how much it weighs. ** Notice I have a label on my marker. If you have tape or a label marking your Copics make sure that the new marker you weigh also has that label so you have an accurate starting point.

refill-2

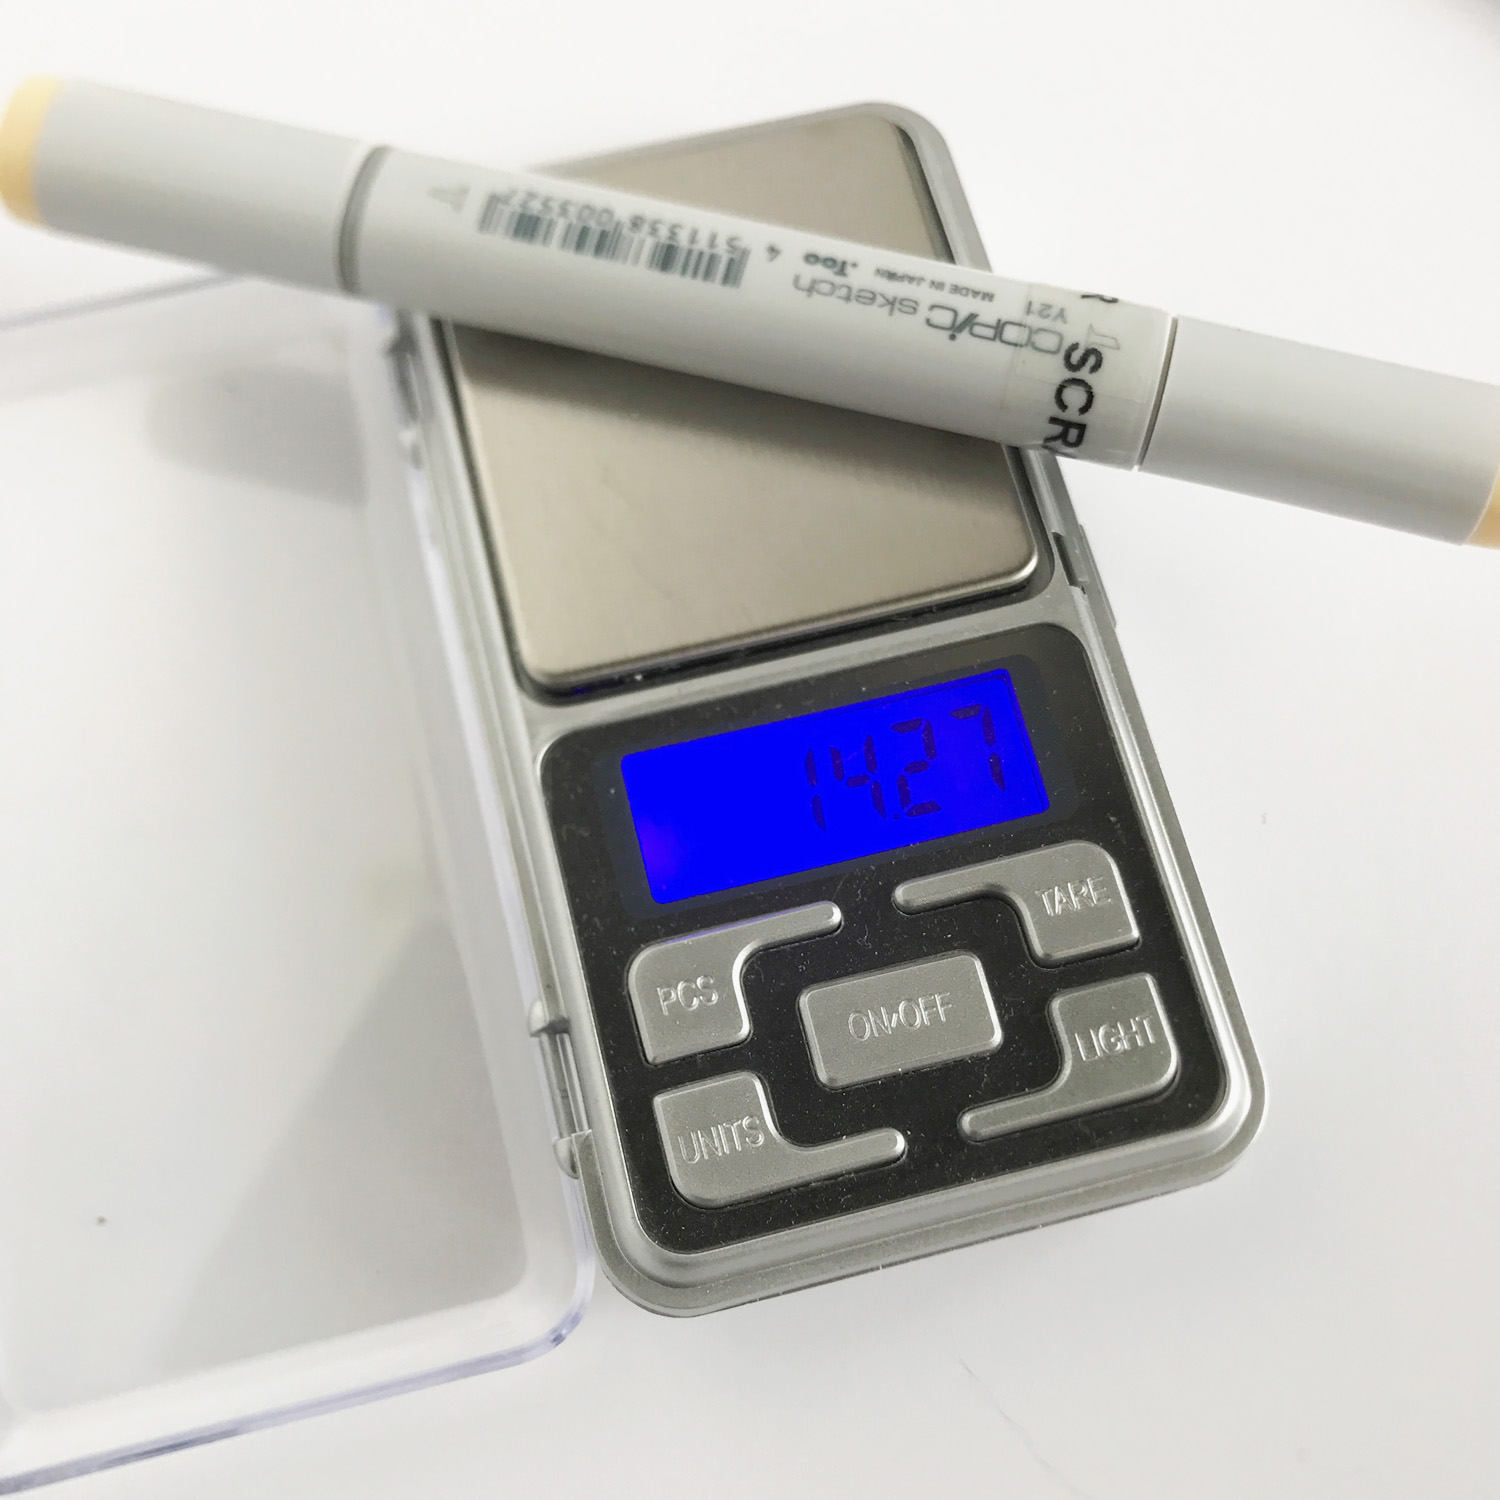
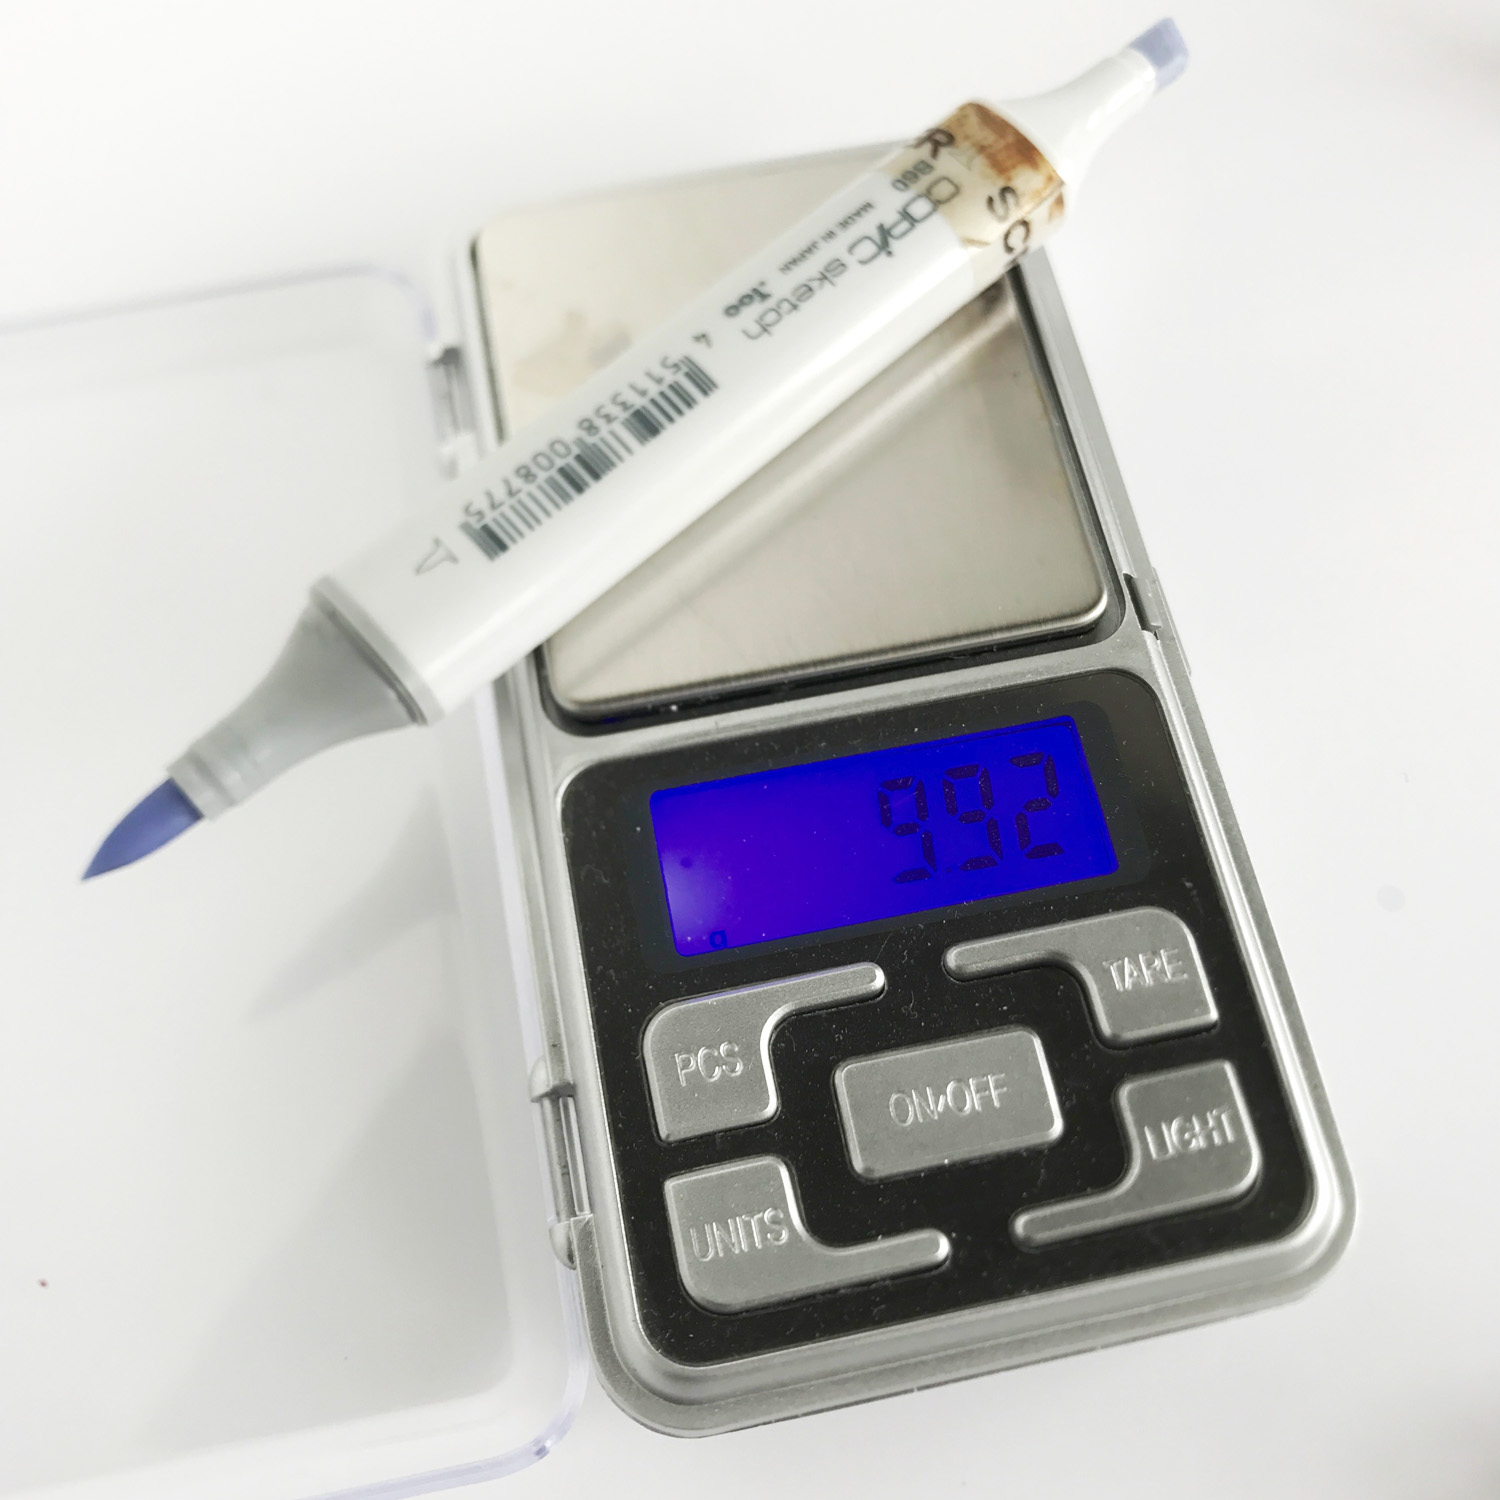
I know that I have colored with this Copic a few times, but very little, so this is about what I am aiming for when I refill one of my sketch markers. Then I pull both caps off and measure again, often I will have to measure several times as I am refilling and I would rather not have to pull the caps on and off as I measure each time.

refill-3

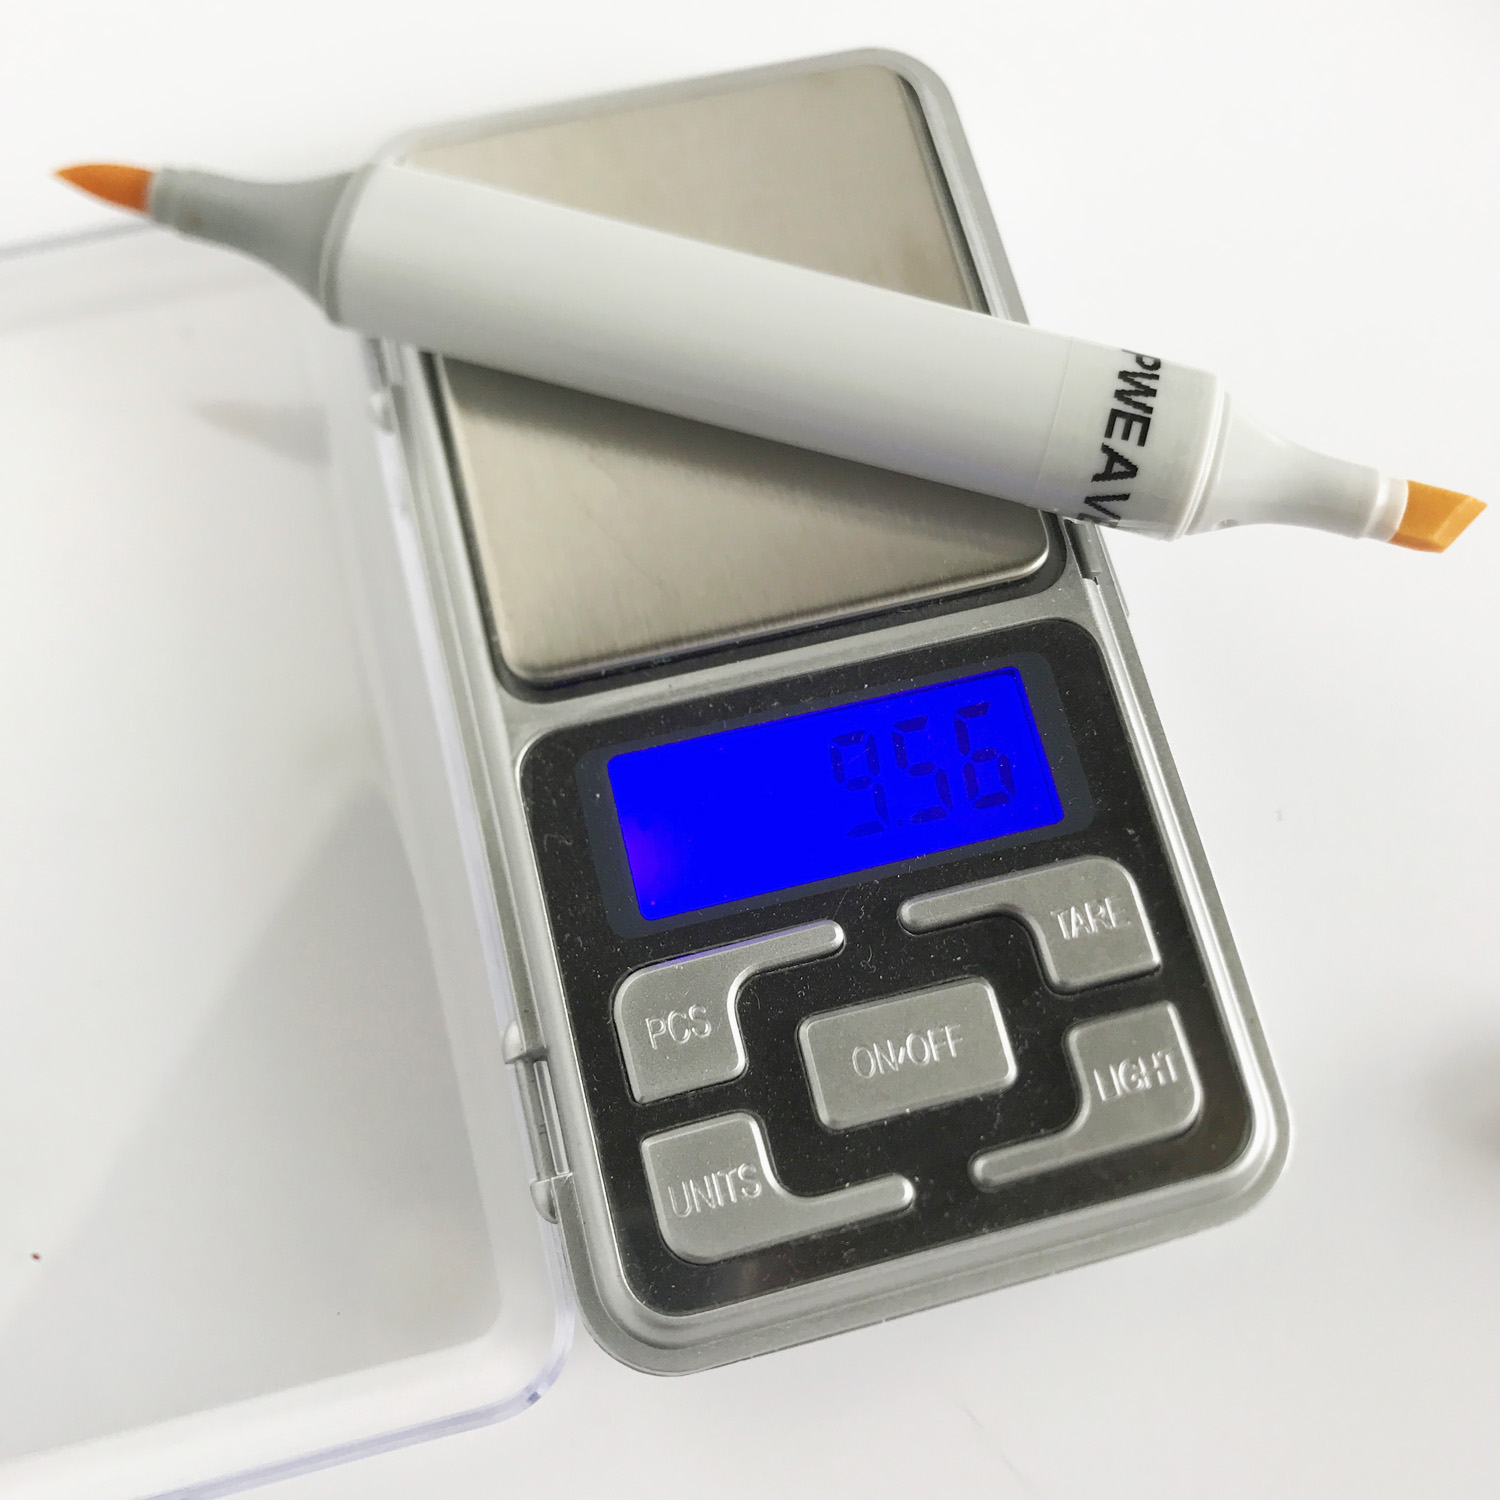
I go ahead and measure one of my markers that needs refilling so I know how much ink I might need to add.

refill-4

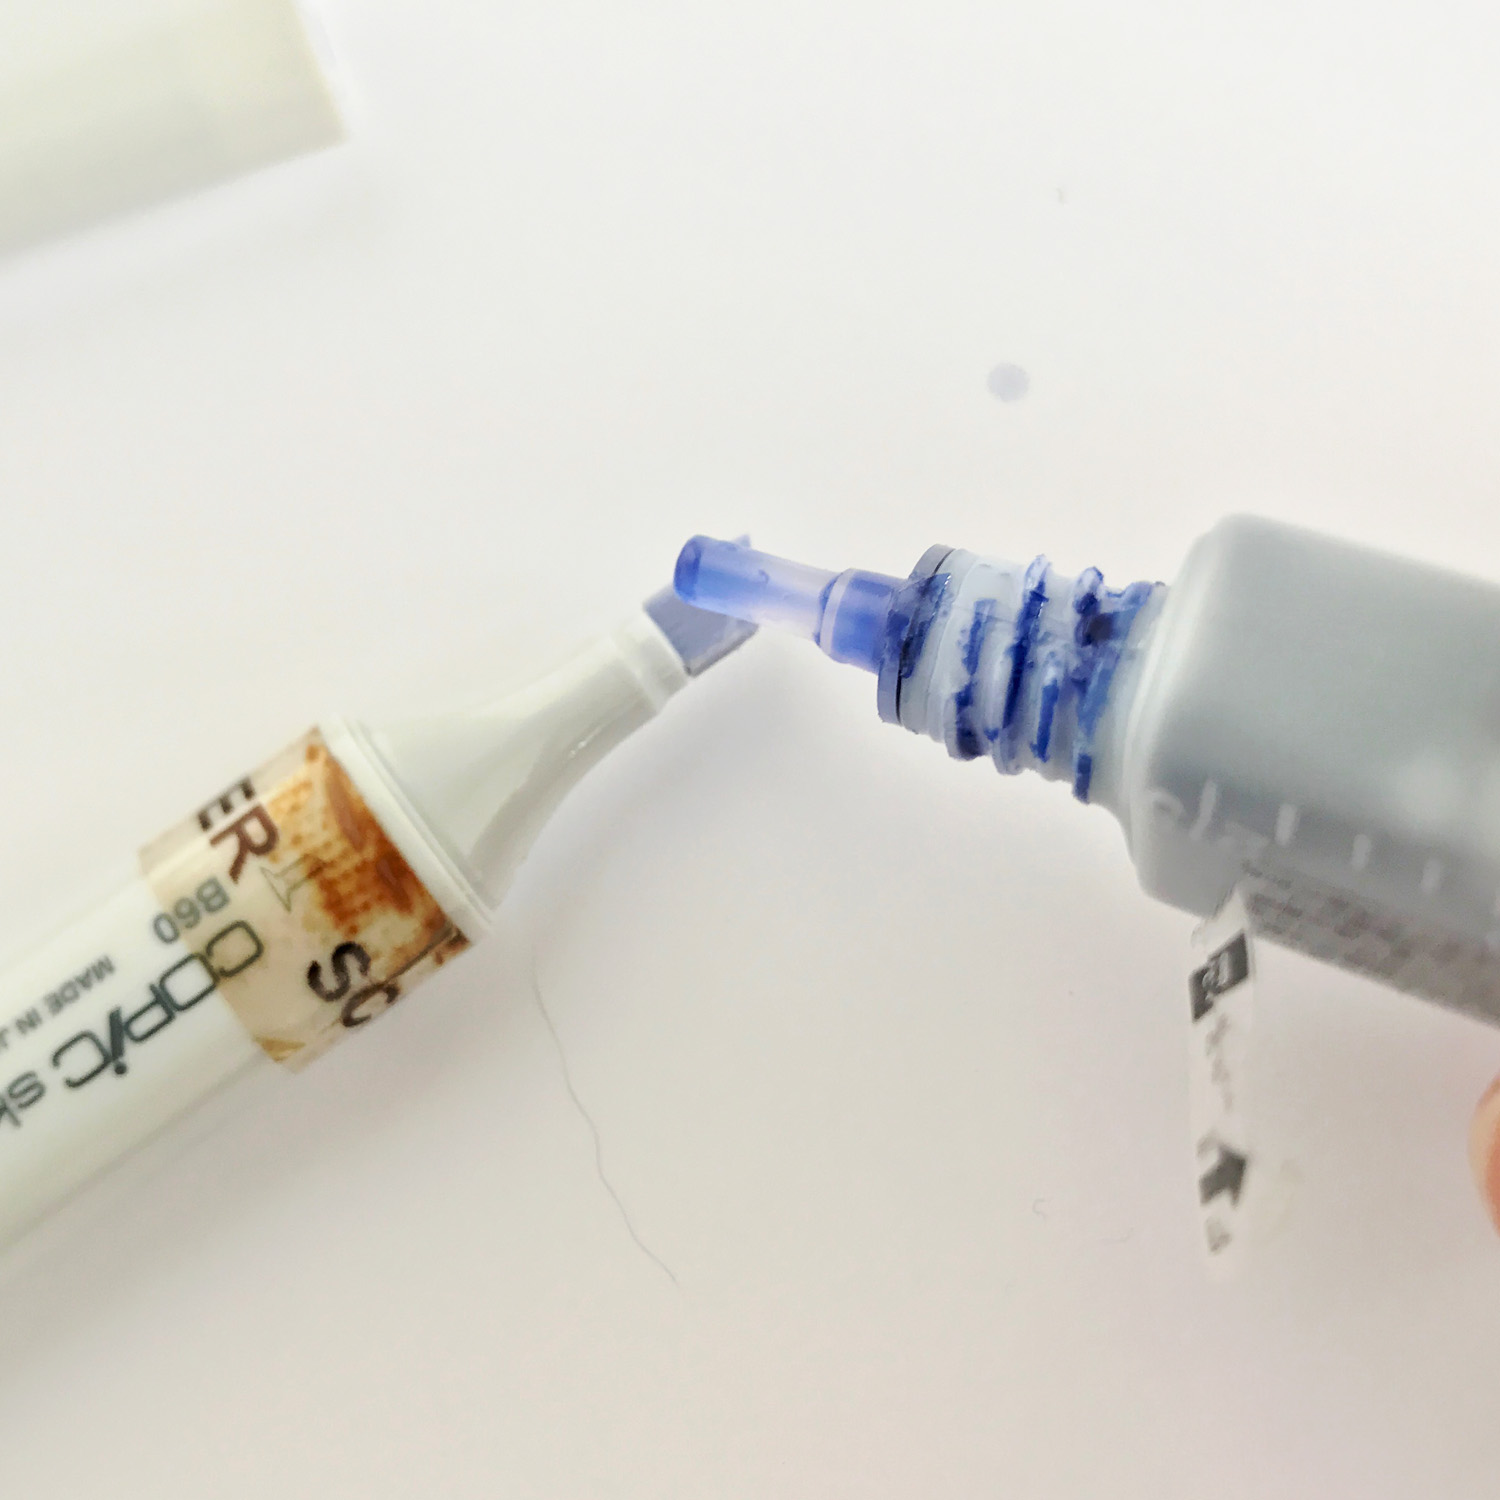
Next I pull both caps off my Copic Sketch marker, this allows air flow through the core and the ink to be pulled into the body of the marker. THE MOST IMPORTANT STEP IS NEXT! Check the lid of your marker and lid on your Various ink not once or twice but THREE TIMES! Just be super duper positive you have the right ink going into your Copic marker!

refill-6

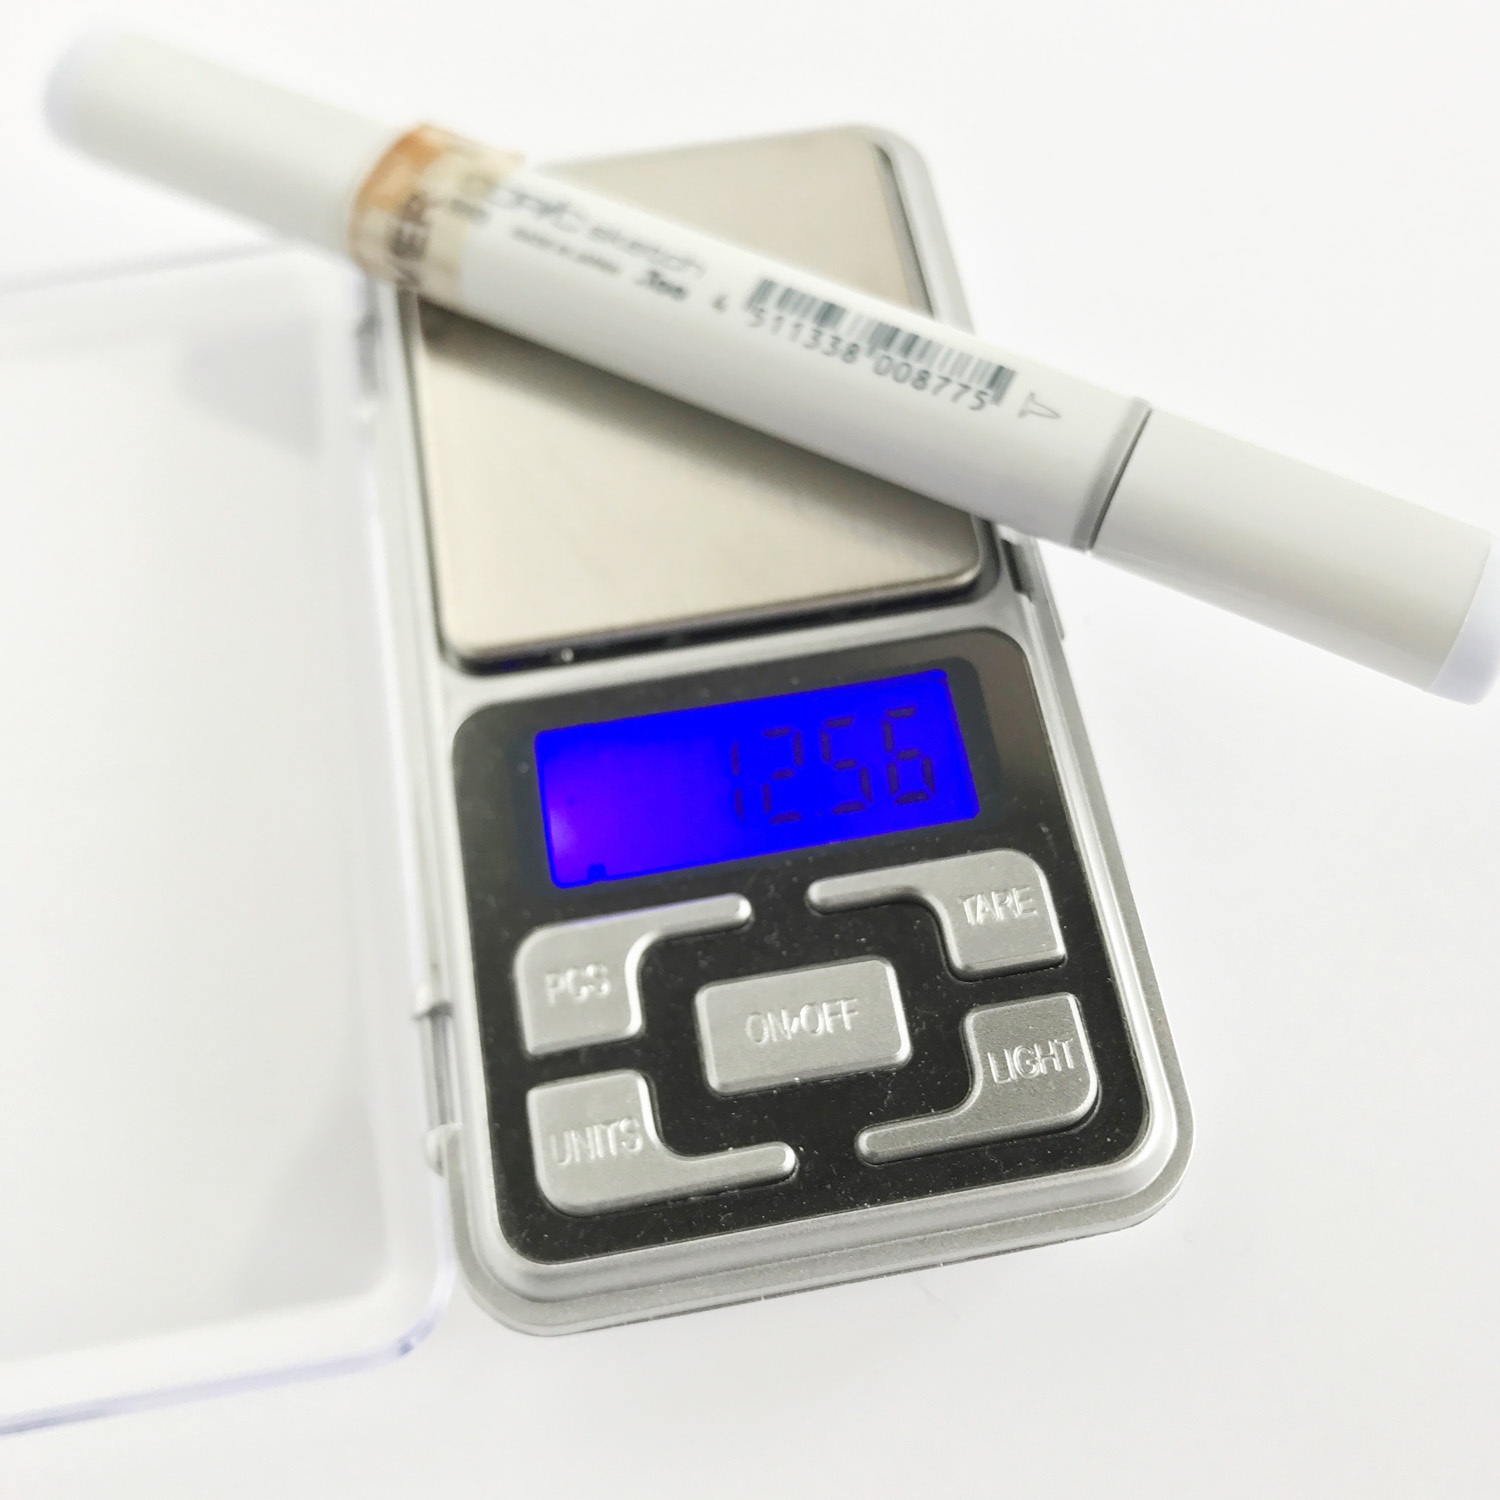
Then I slowly drip ink onto the chisel nib. I usually drip 10-12 drops and then weigh the marker and repeat until I get to my target weight. You can also watch the chisel nib and as the body of the marker gets full the ink will no longer pull into the body of the marker, the nib will remain shiny and wet. 

refill-7

When I reach my goal with caps off I double check with caps on and call it good!

refill-5

refill-8

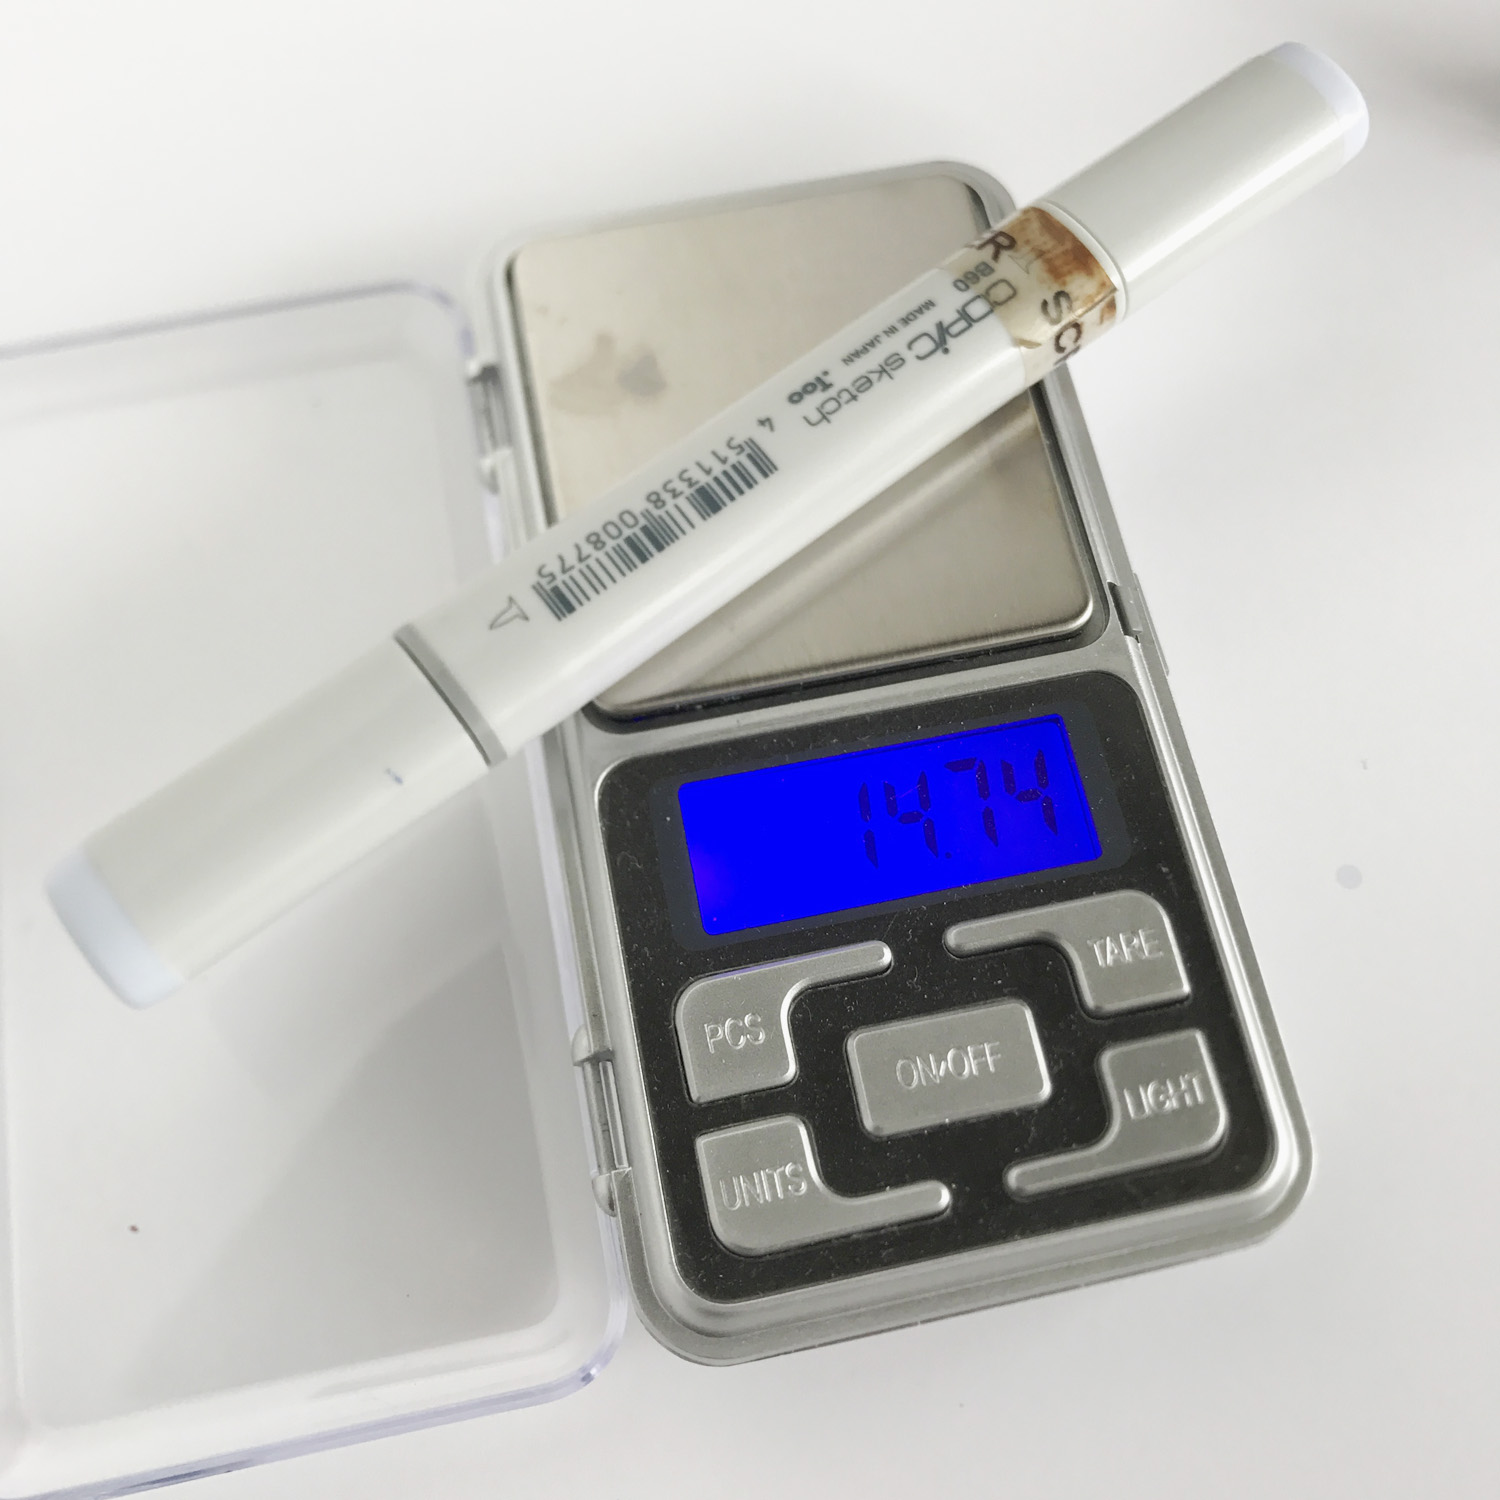
You will notice this is higher then my original new marker. As I said, the above marker was not brand new and I was using it as a starting point. I will keep an eye on this one and watch for blobbing as I color, but I think I should be good!

Copic markers are made to be refilled. Once you have purchased a marker it will last you for your entire coloring career with ink refills and nib changes as needed. 

If you have any questions let me know! And do not forget you can get all your refill supplies at Imagination International, Inc.

Have a Happy Colorful Week!


Posted on

Day 3 and Release Day!

      Today is our final day of Krafty Peeks for the March Release 

 at Kraftin’ Kimmie Stamps! 

We are so excited to share a fabulous sentiment set 

by artist Sabrina van Vloten

 called…

BIRTHDAY BASH SENTIMENTS!

This set is filled with so many wonderful sentiments to help you and your friends celebrate their special days!

Check out BIRTHDAY BASH SENTIMENTS! in so many amazing creations today as you hop around the Krafty Team’s blogs!  You’ll also see the beautiful new stencils, NUMBER IT and CELEBRATE WITH CAKE (a layering stencil!!) along the way! 

Everything will be released after our LIVE Online Release Party TODAY!  All the fun takes place in the Krafty Friends facebook group beginning at 2 pm ET!  See you there!

*Be sure to join us for our Live Release Party as one lucky Facebook commenter will win Krafty $’s!!


I got inky today to play with the new Birthday sentiments. I used Yupo paper along with Copic refills and some gold foil to create the backgrounds. Then stamped right on top of them. In hind site a Staz on ink would have been better, but you know me. Just go with it!

Happy Saturday and release day! Hope you find some fun goodies to add into your virtual cart today! Thank you so much for stopping by.

Have a Happy Colorful Day!

You are invited to the Inlinkz link party!

Click here to enter

Posted on 3 Comments

Back from Break for the January Kraftin’ Kimmie Release!

  Welcome back to Day TWO of our January Krafty Peeks!

Are you excited about what you’ve seen so far!?  Are you ready for more?

I hope your answer was yes because we’ve got more fabulous fun for you today!


The stamp set we are ‘peeking’ for you today is from 
artist Michelle Houghton
 and it’s called…..

KRAFTY GOODNESS!

This adorable set features an assortment of creative Krafty supplies ready for you to make amazing works of “heart”! 

 Check out KRAFTY GOODNESS and our new stencils in so many awesome creations today as you hop around the Krafty Team’s blogs!  

You’ll see more of our January goodies all week, and then everything will be released after our LIVE Online Release Party on Saturday at 2 pm ET in the Krafty Friends facebook group!  

*Be sure to join us for our Live Release Party as one lucky Facebook commenter will win Krafty $’s!!

 
For now, check out all the fantastic goodness in today’s hop!
See you tomorrow!

Feels good to be back from break creating with Kraftin’ Kimmie stamps and a bonus that two of the stamp sets this month were drawn by lil ol me! Today we are sharing Krafty Goodness that includes a set of Krafty supplies to color up and add to your projects. I decided to use my Copic markers of water color paper. Here are the colors I used:

I decided to place the image on one of my inky backgrounds created with my Copic Ink Refills and some gold foil. I like that the splatter of the ink works with the image so well.

The water color paper blends BEAUTIFULLY giving a very soft effect. So you might have heard that you should NEVER use Copics on watercolor paper. Let me dispel that myth! You can work on basically any surface, but there are consequences, or at least information you should be aware of when stepping away from the standard cardstock or Bristol. Watercolor paper is UBER absorbent. It holds a lot of moisture, that is its main function. So when using your Copics it uses a lot of ink! A LOT! So if you are concerned about drying out your markers a little more quickly this is not a technique you want to try. Otherwise play away and be ready with refills.

he puddle of ink below the paint brush is accomplished with tip to tip coloring. I picked up some ink with my Copic Colorless Blender marker and colored that onto the page. It gave it a watery, painterly look. (It also added a lot of the alcohol solution over my stamped sentiment and made it bleed a little, oh well) Thank you so much for peeking in! I will have a couple more shares over the next few days, hope you can stop back by!

Have a Happy Colorful Day!

You are invited to the Inlinkz link party!

Click here to enter

Posted on 3 Comments

Holiday Sentiments for November Kraftin’ Kimmie Peeks

          Who’s ready for lots of brand new Krafty goodies?!

It’s time for our November Release Peeks to begin 


Today we’re featuring an awesome Christmas sentiment set,


designed by Sabrina van Vlotten

 and it’s called…..

HOLIDAY SENTIMENTS!


You’ll find lots of funny, punny and traditional holiday sentiments in this set! Really, something for everyone – even the naughtiest! 
 
As you hop around the design team’s blogs today you’ll be able to check out HOLIDAY FUN SENTIMENTS! in action in combination with a lot of our other new 


November Kraftin’ Kimmie products!  


We’ve got TWO new Krafty Stencils for this month’s release to help add some funky fun to your creations!  


They are called….
KRAFTY SCENERY 4!


and COOL CRYSTALS!


Both designs are perfect for all your cards, scrapbook pages, mixed media and more!

Plus we have our exclusive NOVEMBER ADD ON BUNDLE!

Our exciting Add-On bundle this month features several amazing products which will coordinate with our new goodies and will help you enhance your new creations!! 


This month’s special curated Add On Bundle includes:


  • 49 and Market Artoptions Holiday Wishes Chipboard Set
  • Teal Raspberry Opal Polish Blaze
  • Pinkfresh Holiday Vibes Die

  A limited number will be available in the shop on Saturday afternoon after our Live Release Party! Get ready to get krafty!!


You’ll get to see all of our brand new goodies in action over the next few days of the November Krafty Peeks and everything will be released at our LIVE Release Party 


on  Saturday, November 12th at 2 pm EST in the Krafty Friends group! 

*Be sure to join us for our Live Release Party as one lucky Facebook commenter will win Krafty $’s!!


For now, hop around and check out some amazing creations from the Krafty Team! Our fabulous designers can’t wait to share their inspiration with you!

Come on back tomorrow for some more krafty fun and goodness!


The holidays are upon us, the stores are decked out in red and green, trees and decorations abound! So it is perfect timing to share a few more holiday sentiments for last minute cards as well as fun tags and notes. I decided to combine todays new release with a few items from the add on kit. If you are a crafter this month’s kit is the bomb! Glitter, chipboard, die cut OH MY!

I kept it really clean and simple as usual. I created the background using my Copic Refill inks. I dripped ink on Yupo paper and then blew it with a straw. I did this multiple times with the following colors; B00, G00, B04, G05. While the ink was still tacky at the edges used a gold rub on foil to add the gold touches to the inky background.

I trimmed the inky background and ended up with four chunks to use on card fronts. I attached one to a card base, stamped one of the fun holiday sentiments and added some of the wonderful chipboard from the add on set.

Thanks as always for stopping by you will love the next two stamp sets this month. Make sure to check in over the next few days to see all the November inspiration.

Have a Happy Colorful Day!

You are invited to the Inlinkz link party!

Click here to enter

Posted on

Shop and Hop the September KK Release!

      Woohoo!!!

Today we are celebrating all the new fabulous goodies in our September Release that are NOW available in the

 Kraftin’ Kimmie Stamps Shop!


All FOUR of our new stamp sets, plus two new stencils and a new hybrid ink colour were released yesterday along with our exclusive 
ADD-ON BUNDLE, 
and we’re excited to share it ALL with you in a fabulous krafty HOP!
 

So let’s check everything out as we hop around the Krafty Design Team’s blogs today!  Grab a nice cool beverage, sit back and relax while we take you on the krafty tour!


First up we have a set featuring beautiful Fall images and sentiments


designed by Michelle Houghton

 and it’s called…..


Next, is an adorable cozy Christmas scene by
artist Neda Sadreddin
 and it’s called…..


COZY CHRISTMAS KIDS!


Third, we have a wonderful scene straight out of the North Pole

by artist Sabrina van Vloten

 and it’s called…..


SANTA’S VILLAGE!


Lastly, we have a beautiful holiday floral set 
by artist Michelle Houghton called…

PERFECT POINSETTIAS!


We have a gorgeous new ink colour called 
As always it will be available in full sized ink pads, ink cubes and ink refills!


We’ve got TWO new Krafty Stencils for this month’s release to help add some funky flair to your creations!  They are called….


A New 2 Piece Layered Stencil!!
(*note This stencil will be available for Pre-Order and will be in stock by month end!)
 
 
We’ve again carefully curated an awesome ADD ON BUNDLE featuring several amazing products which coordinate beautifully with our new goodies!!


You’ll be all set to start your
crafting with this month’s Add On Bundle, which includes:


  • Echo Park Jingle All The Way:
    – Puffy Stickers, 
    – Frames & Tags Ephemera, 
    – Washi Tape


And don’t forget our awesome Stamp Of The Month – which you’ll notice coordinate with Santa’s Village!! We have the very cute Elf Made stamp, which is FREE with your order of $75 or more before shipping/tax!  (while supplies last!)


Now head on out on today’s celebration blog hop and check out all the new products in action as the Krafty Team shares their incredible designs!  Then jump on over to the Kraftin’ Kimmie Stamps shop and grab some of these fabulous goodies for yourself!

Happy Krafting!

I have two cards to share today. One with my new Autumn Pumpkins and one with my Poinsettia set! Copic coloring all around of course, let’s take a look at the poinsettia card first.

the only Copic missing in the photo is B41 with is the color I used in the background.
gray cloudy days have stuck around here for a couple months so I am struggling a bit with photo contrast. This is a little blown out. Just an FYI

The card has some simple layers of cardstock, patterned paper and vellum, easy peasy.

Next let’s take a peek at another pumpkin card.

Notice that I colored all the pumpkins, vines and leaves with the Neutral grays first then added only one yellow red and one yellow green to finish them. It gives the coloring a vintage feel.

The card is layers of patterned paper again. Simple and sweet, quick and easy is my mantra these days!

Hope you are picking a few things from this month’s new release with 4 stamp sets, ink, stencils and add ons there are lots of fun things to choose from! Thanks for hopping by my creative space!

Have a Happy Colorful Day!~

You are invited to the Inlinkz link party!

Click here to enter