Posted on

Air Brush Copic Style

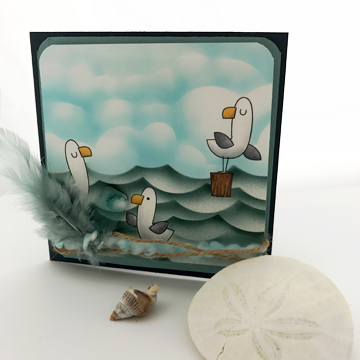
Today I am playing with my ABS or Air Brush System. I decided to air brush everything! So I started with the standard crafter use for the air brush. I colored my simple image:

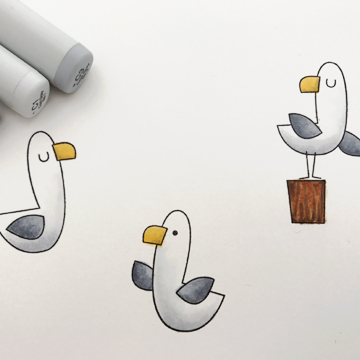
This is a stamp set by My Favorite Things. I used C1, C3, C5, 0, Y21, Y21 and E31, E25, V99, those last 3 are only on the wood. Then I masked off the seagulls by fussy cutting a second stamped page and then used post its to mask the bottom half of the image. I also have this new stencil by My Favorite Things that is perfect for these little guys.

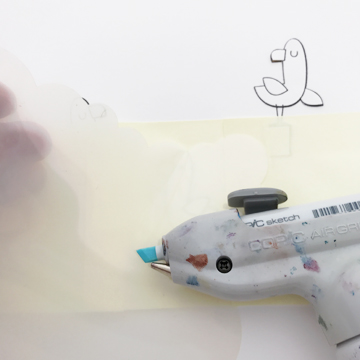
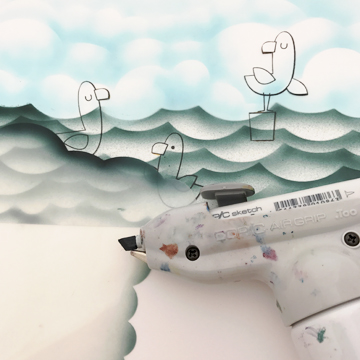
Background layer gets air brushed I used the same stencil for the clouds with the scallop shape pointed up and then turned the image over, pointed the scallops down and created waves.

Then I needed to create a card so I pulled out a lot of white and clear do dads. 

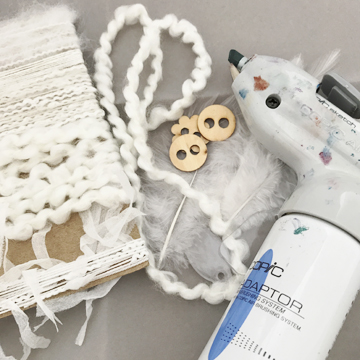
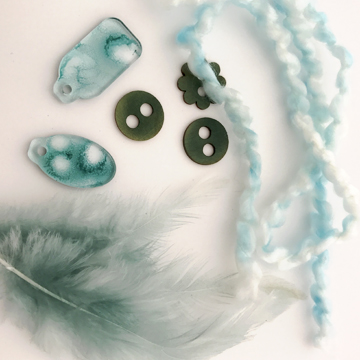
One of the great things about Copic ink is that it works on any surface so I can use it on plastics, cloth, wood and yes even feathers. I used similar colors to the card and colored up several things.

**Here is an air brushing tip: when trying to airbrush light items like fibers or feathers, considering taping them to your work surface with re-positionable tape to hold them down instead of getting inky fingers.**

My personal favorite is the plastic tags. I can airbrush them smooth, but this time I started smooth and then switched colors and sprayed really close to the plastic to create the blotchy appearance.

Next pull it all together. I added some of my airbrushed embellishments to my image and created this fun card.

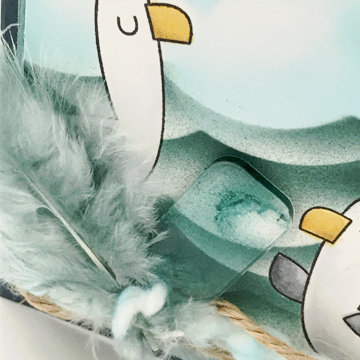
My favorite spot is in the lower left corner where all that airbrush loveliness gathers.

The Copic ABS system is crazy versatile and I have just touched on some of the basics with this card. If you have questions about how to choose which system please ask or trouble shoot your airbrush work let me know! There is also a lot of great information at the III web site and also we have several videos featuring the ABS system over at the Copic In the Craft Room YouTube channel.

Have a Happy Colorful Week!


Posted on 18 Comments

Blog Hop with Dare 2B Artzy!

Welcome to Dare 2B Artzy‘s Blog Hop!!

Summer is such a beautiful time of year!  

It’s always so fun to see all the beautiful flowers blooming!!

In honor of summer, we decided to have a fun Blog Hop with the theme of Dreaming of Flowers!

A few DT members are using previously released floral stamp sets and a few are using two of our newly release floral stamp sets! 

If you haven’t had a chance to see our newest two floral stamp sets, be sure to check them out; Wishing  Happiness and Playful Posies!! They are beautiful and so much fun to use!!

You should have arrived here fromTonya‘s

blog!  If you haven’t and would like to hop along with us, please go back to the Dare 2B Artzy Blog to start at the beginning!

Be sure to follow each blog and leave comments along the way for your chance at winning!  We will randomly choose a winner from one of the blogs, so the more you comment, the more chances you have to win!!

Winner will receive a stamp set and ink pad of their choice!!

Blog Hop will end Sunday, August27th 7:00pm Eastern.  

We will then post a winner!!

 I am excited to be showcasing one of the new stamp sets from Dare 2B Artzy, Playful Posies. This stamp set is so very versatile! 

I’ll let you in on a little secret, I am not really a card maker or stamper I just pretend to be one for work! I LOVE all kinds of art and crafting, and have played with card making and stamping, but did not really get serious about it until I started working for Imagination International, Inc. (Better known to most as Copic) That being said I just do not have a huge store of stamping supplies and tools. I am slowly collecting like any good crafter the things I “need” for this craft, but in the mean time I am making due with what I do have. 

With this layering set one of the really fun things to do is to layer colors of ink with the different pieces, but I do not have different colors of ink, so my solution as always is Copic! I decided to stamp my bottom layer with Copic and then added black ink on top. I added a few doodles in white on top as well.

Once the images are ready I got them all fussy cut and added them to a card using papers from the “Artsy Doodles” paper pack.

Here is a closer look at some of the details.

Best part yet, I did it all on video! So you can see me, mistakes and all, experimenting with the stamping process. Spoiler Alert it took me more then once to get the flowers just how I like them. The video is over at Copic In The Craft Room on YouTube and you can find it at the link below.

Thank you so much for stopping by today, make sure to stop by the other designers for Dare 2B Artzy they are all playing along today!

Your next stop in the hop is Chris blog!   

We hope you are inspired all along the way!  

Check out all D2BA’s products here!

Have a Happy Colorful Day!


Posted on

Copic Classes in Full Swing

Our Fall season of Copic classes are in full swing! We have old and new Workshop Weekends open across the country for registration and we even have one last Certification Weekend in Canada for the 2017 season. make sure to check my list of open classes in the side bar of my blog OR head strait over to Imagination International, Inc. to check out times, locations and get signed up to join us for a weekend of Copic Coloring fun!

Hope to see you there!

Have a Happy Colorful Week!

Posted on

Inky Fun with Dare 2B Artzy

I had an amazing time working with my new Dare 2B Artzy Leaf Background Die. As always, in all honesty I was not quite sure what my plan was when I chose this particular die. BUT as soon as I sat down with my Copics and supplies I came up with a concept. 

My goal was to keep the die very clean and make it pop by adding some sort of pattern behind the crisp die cut. I quickly created a background paper with Copic markers, vellum and Colorless Blender. 

Next I trimmed the vellum (when it was dry) to fit behind the die cut, I layered the card base, white cardstock background, vellum and die cut. Then cut a leaf out using that portion of the die set, stamped my sentiment from the Be Yourself stamp with my D2BA Ink and colored it up with my Copics.  It ended up coming together just like my vision. I will be looking for more die cuts like this one, this card came together so quickly and is so pretty! It is a design you could mass produce extremely quickly as well!


This week you get to see the whole process on a video:


Posted on

Dare 2B Artzy Design Team Post #1

Hey friends I am joining the talented team over at Dare 2B Artzy for the next 6 months as part of their Design Team. I am honored and excited to work with their beautiful products. 

Here is a link to my first post over at there wonderful blog

Seeing Beauty with Dare 2B Artzy

The card featured is one that I shared a couple weeks back, but worth sharing one more time 🙂

I used the “Best Day Ever” stamp set, my Dare 2B Artzy Premium Ink and wonderful papers for the “Artsy Doodles” paper pack.(not pictured)

I stamped my frame and sentiment with my Premium Ink pad which is compatible with my Copic markers. Then used my Copics with their new Fine Sketch nibs to color in all the fun little details. No shading needed here just coloring!

Here is a look at the full frame all colored up!

Then I added a color inside the frame, again note how well all that rich black ink sits with Copic ink on top!

I kept my card really simple with 2 layers of beautiful patterned paper and a Kraft card base.

Easy peasy!

To see more beautiful Dare 2B Artzy inspiration head over to their blog!

Have a Happy Colorful Day!