Today at Get It Scrapped there is an amazing article about welding on your layouts. There is a slew of gorgeous examples of both digital and paper welding ideas. Many are cut on electronic diecut machines, mine is hand cut and others are wonderful digital creations.
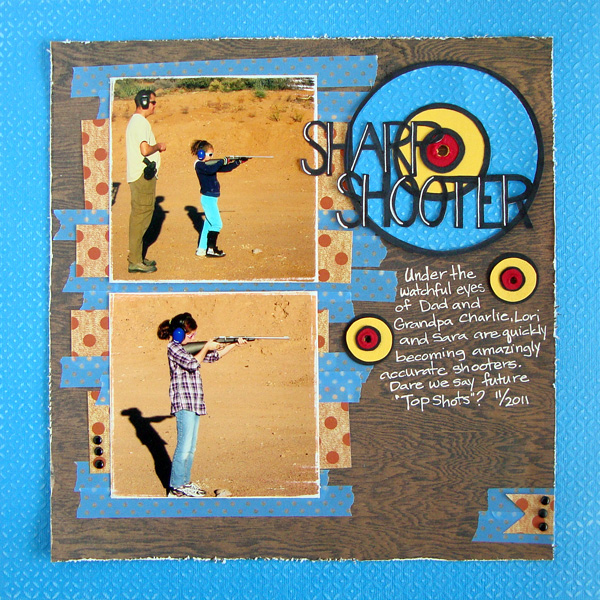
Sharp Shooter by Michelle Houghton | Supplies: cardstock; Bazzill, patterned paper; Basic Grey and American Crafts, washi tape; Queen and CO., ink; Sharpie and Signo, brads; unknown
The black lettering in the title for Sharp Shooter and the black rings of the target are all welded together, meaning they are cut out of one piece of paper. Doing this by hand took a few tries as I was not completely sure on sizing and the color of each of the parts so I made a couple rough drafts that did not get completely cut out to start. One option even had “shooter” in a cursive script. I cut that one all the way out and it just did not work so back to the drawing board. 🙂 These are the steps I used to get the finished title weld you see above.
1) I used a ruler and gave myself some VERY light guide lines for the lettering.
2) Again with pencil I used block lettering to create the title, making sure all the letters were connecting side to side and that the top word connected once or twice to the bottom word.
3) Still with pencil I traced 3 concentric circles that overlapped both words. I was not worried too much about perfection on size or even spacing here, I really just eyeballed it. It is OK to me if there are imperfections showing that it is hand made.
4) I used a thicker Sharpie marker to go over my title and the circles a few times making the lines quite a bit thicker. I also went back in with a white Sharpie paint pen to ass highlights on the letters making them easier to read.
5) Now came the time consuming part, cutting it all out. I always start with a pair of micro scissors and cut away as much as I can with those. Then I break out an X-acto and cutting matte to finish the cutting.
6) I started with my smallest circle and backed it with red cardstock then added yellow to the middle rind and blue to the outer ring. I finished by hole punching the center of my target and roughing up the edges of the hole to show a direct hit by my “Sharp Shooter” daughters!
I also made the two smaller targets to help add balance to the layout and so it looks like Sara is getting a direct hit from her photo as well!
Make sure to stop by Get It Scrapped and see all the wonderful inspiration! HERE
Happy Wednesday!